
Start painting
Corel Painter gives photographers a helpful entry into digital painting
• June 2016 issue
Each release of Corel Painter introduces features for all kinds of artists, and for photographers who want to offer digital painting, the additions to Corel Painter 2016 are designed to make the process easier.
The new welcome screen helps point you in the right direction from the beginning with tabs labeled Learn, Get Content, Get Started, and Get Inspired. These tabs lead you to training content, add-on brush sets, preset workspaces, and artwork created with Corel Painter 2016 to show you some beautiful examples of what’s possible.
Three options are available for making a digital painting from an existing photograph: auto-painting, painting from a clone source, and free painting. The first two methods have the quickest learning curve. From the Get Started tab, you can click Photo Art to have Painter arrange the workspace for you. You begin by opening the image you’ll be painting (known as the source image).
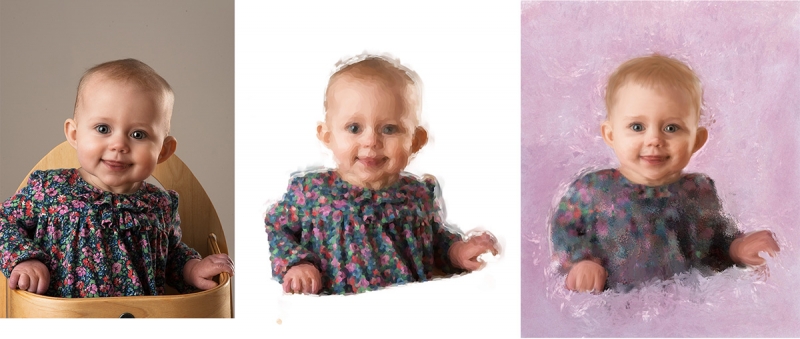
I prepared my source image by bumping up the color saturation and simplifying the background by removing a chair.
In the auto-painting panels I primarily used Underpainting, Auto-Painting, and Clone Source. To bump up the saturation, change the contrast, or make general adjustments to your image before painting, you can use the Underpainting panel, or just make the adjustments in Photoshop prior to importing the image.
To begin the Auto-Painting process, define the source image from the Clone Source panel. Click the floppy disk icon with an arrow in the bottom left corner to define the source file. You can switch source files at any point while editing, which I’ve done to pull in different colors for the background and foreground; the possibilities are endless.
In the Auto-Painting panel, select Smart Stroke Painting and Smart Settings, then click play, which lets Painter 2016 determine all the settings and creates a finished painting quickly. Just don’t click away to another window or do any other editing elsewhere because the Auto-Painting will stop. (You can also stop it intentionally at any time.)
The process begins with big brush strokes and progresses down to smaller sized brushes. The final painting may or may not be what you envisioned, so many artists use it as a starting point for further refining such as bringing out the details in the face. If you don’t like it, just clear the canvas and adjust your Auto-Paint settings.
When you want to add your own hand brushwork to an image, you can use the clone source tab in conjunction with cloning tools. Unlike Photoshop’s clone tools, which are very limited, Painter 2016 allows many of its standard brushes to be turned into cloners. It’s a simple matter of clicking the clone stamp icon in the color picker. If the color picker shows shades of gray, Painter pulls the color data from the source image; if it shows various colors, you can manually select the color for your brush.
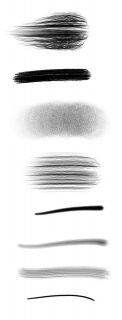
The Photo Portrait pack ($29.99) is a new add-on of 15 brushes that streamline the photo painting process. It has brushes for painting background, skin, hair, and the like. I found that these brushes took the guesswork out of getting started. Just hover over a brush, and the bottom of the toolbar displays what the brush looks like and how the brush stroke renders. I also tested the Hair Set pack ($29.99), which includes 15 brushes, and I found the textures and varieties to be impressive.
Armed with this combination of brushes, I filled in rough strokes on the face and hair. It’s important to keep in mind that a longer brush stroke will pull original color and tone through to areas that might not have originally had that color. So for parts of your image needing more detail or with greater tonal ranges, use shorter, stippled strokes. For obvious brush strokes in the final image, you can leave them as is or use the blending tools to smudge the colors. Short strokes that circle around will produce a better blend. If you’ve ever done any shading and blending with traditional media like graphite or pastels, you’ll be familiar with this concept.
When you’re learning how to paint and finding your style, it’s tough to know when to stop. You could fine tune for hours and still not feel done. Aim for a consistency of realism, textures, and brush technique throughout your image even though they may be applied to areas differently. For an extreme example, photorealistic eyes look out of place if the rest of the painting is impressionistic. Consistency is particularly important if you plan to enter your work in the International Photographic Competition.
To practice brush technique, I did a quick still life painting of a lime based on a photo I took. I had fun experimenting with the Sargent brush and palette knife. If you’re going to work on portraits, you will likely feel more encouraged if you start simple. Don’t pick a complex portrait as your first painting: Start small and work your way up from there.
Overall, I think Painter 2016 is fantastic. I loved being able to paint with different media and walk away from my creative session without a drop of paint on me. The brushes were responsive and realistic, and I was able to produce finished paintings quickly. I have a lot of room for improvement, but the nice thing is that Painter 2016 includes a number of ways to get you started.
For photographers who aren’t used to working with traditional media, the hints and visual tool tips are a godsend. The brush strokes are intuitive and realistic, there are countless customizing options, and with the addition of photo-oriented brush packs, there is a drastically reduced learning curve. If you have Photoshop brushes that you just can’t do without, Painter 2016 allows you to import them and even edit the settings. One caveat: If you’re used to Photoshop, you may bemoan the lack of a history panel or history snapshots, so save often and as multiple versions.
Painter 2016 is $429 (upgrade for $229), and brush packs are $29.99 per set. A fully functional 30-day free trial of Painter 2016 is at painterartist.com.
Betsy Finn is a portrait artist in Michigan.
Tags: corel painting post capture technique